


As elementary teachers, we all know that guided reading is such an important part of student's day. In college, they don't really 'tell you' how to do guided reading. It really is something that you feel like you just have to figure out. There are so many opinions on ways to do it, and really there is no 'wrong' way to do it... that's what I am told anyway... but when I do it... I sometimes feel like I'm not doing it the right way. So, I researched and did a bit of professional reading.
I wanted to write this post to not only help improve my own teaching, but help you as well if you're feeling like I do sometimes.

Before, I start talking about how to plan for guided reading, we need to remember it's purpose!
I found this quote that you see in pink below.
It really resonated with me. Guided reading is about giving the students increased time to READ. Sometimes I think we feel like we need to fill every second with an activity of some sort, when really, the kids get better at reading and comprehending by simply, reading and discussing the text.
This is something, that I need to be reminded of as I plan my lessons.

So, now the planning part and getting ready to be the BEST we can be! How do we plan for guided reading and make sure we meet our kid's needs?


The first thing that must be done, no questions asked is assess your kids. Yes, it takes an entire week...(or more) but it's more than worth it. Through assessments you want to learn student's instructional levels. When you learn their instructional levels then you are able to choose texts that will allow them to grow as readers. As you assess students reading out loud you want to conduct some sort of running record. My school has a kit that we use.
The students read the text out loud and I listen for any miscues.
Yes, it makes me feel like this... after listening to 20+ kids read the same 4 books. :-P
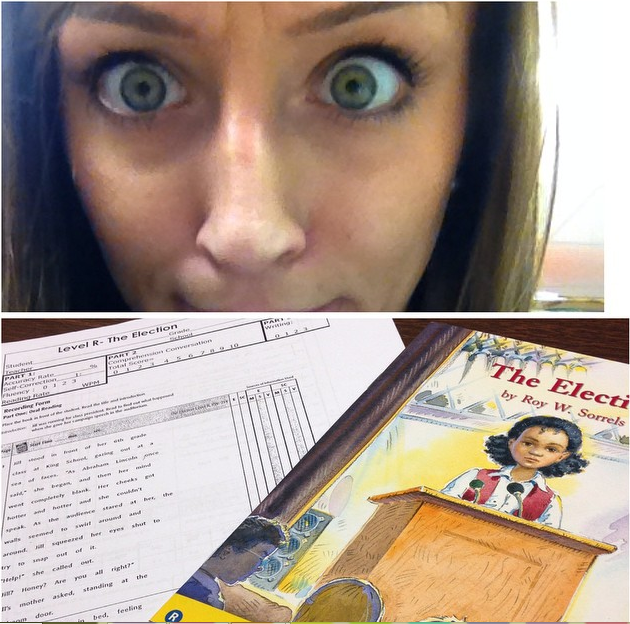
But it's worth it!
When listening to students read I can gather information such as: the student isn't 'seeing' the correct beginning or ending sounds, the student keeps missing a particular vowel sound, the student skips words as he or she reads, the student may say a different letter sound for a given letter, the student may not be able to read multi-syllabic words, or the student needs to work on their overall fluency. There are so many factors.
After I assess students reading, I go back through the data and look for patterns. I then make note of the patterns that I see, so I can make sure to address those in my guided reading sessions with the student. I just write it on a sticky note because then it helps with grouping students in guided reading groups. To keep track of progress I like to put their sticky note on an information form for that student. It's very helpful for conference time.
Another aspect of assessment is to assess comprehension. To assess comprehension, I ask questions about the text. Some require students to answer questions where the answers are from inside the text, some answers require students to infer while others require students to provide explanations about an event in the text. I use the answers to comprehension questions to help me identify which comprehension strategies we need to work on in small group.
**************************************************************
If you teach K-2 (sometimes 3) you will also want to assess sight words.
I simply use a binder system to assess these.

All students start at list one and I assess them until we reach their instructional level.

After we find their instructional level, each student is given a mini-book with the list they need to practice. Students keep their booklet and practice those words during Word Work.

This is a super easy, stress free system to assessing (and keeping track of) students sight words!
You can grab this here: Master My Sight Words


After you've assessed your students, you need to then form your groups. When forming your groups look for common patterns in their learning needs. You can form groups according to their instructional level, based upon what they need in terms of reading fluently or even what they need in order to successfully comprehend a story. Much of the time, I have found that the students within the same instructional level need about the same things. This is how I have grouped my students thus far. I would love to group them in other ways, but I just haven't quite figured it out yet.
This article is a great one to read if you are at the point.
If you notice after some time that a student is making progress and ready to move onto another instructional level (do the assessment first!), then don't be afraid to move them to another group. If the student needs to move down an instructional level, then don't be afraid of that either (assess again). We are here for the students and to meet their needs. Always be flexible. It's a good thing!!
This is how I organized my groups last year.
The guided reading groups were in the same groups for reading stations.
You can grab the station label and editable name cards here.


The next step in guided reading is choosing books for your newly formed groups!
How the hayyyy do we do that successfully? There are millions of books!!

It's really not too hard. We are teachers, we have a calling for what we do and we are GREAT at making the right choice for our students. We know our kids, and we know what they will be interested in. But, some things to keep in mind anyway:
- Look for a book that the students will be interested in. Make sure it has a plot (problem/solution).
- If you have beginning readers, then choose a book where the text is clear, crisp and clean. Make sure there is enough space in-between the words too! Reading small, close words can be hard for those beginning readers to read.
- Vocabulary: Make sure there aren't too many new words in the text. You want there to be a few, but not so much so that it will deter students from understanding the text.
- Imagine reading a text yourself, where there is one or two foreign words on each page... that's kind of how the students see it when they don't know a word. It's tough!
- Look at the pictures. Will the pictures help students read the text and add to students comprehension of the story? You really want to make sure the pictures support the meaning of the text.

So, you've done everything above... now what?
Before the kids read the book...
- Read the book that you're going to be using in your guided reading group with your kids. You have to!
- Decide how you are going to introduce the book to the kids. Come up with some sort of Gist Statement. Example: for a fictional text, name the characters of the book and briefly introduce the problem. This will build excitement and interest! For non-fiction text, state what the kids might learn and allow them to tell you their schema, you can even write it down... or they can!
- Take a picture walk. Taking a picture walk helps the kids construct meaning and begin to discuss what they think is going to happen in the book. This is a must for your new readers!
- Introduce new vocabulary!!! Do this during the picture walk! Use the pictures and a kid friendly definition to help kids learn what the word means. As kids walk through the text, point out the unfamiliar words or ask.... "Oh, I see a tricky word! Do you?" Read it to them, explain it, connect it to the picture and then ask them to read it and talk about it. Bring it full circle!
When, I teach vocabulary to students, I love to use the Frayer model! Easy, quick and oh so purposeful!
You can grab this one here for free.

So... all of this before we even read the dang book with the kids?! Ha! Yep, if you want to get the most out of that guided reading session! You really want the kids to start constructing meaning BEFORE you read the text!
Now, what do you do while the kids read it?
Do we do round robin reading, take turns, silently reading, whisper read?
Oh my goodness, there are so many options!
Oh my goodness, there are so many options!
I personally find the biggest benefit in having my early readers read the text softly.
This the perfect time to pull out those reading phones.
This the perfect time to pull out those reading phones.

(I went to Lowe's and bought PVC pipes instead though (cheaper)) ;-)
Photo: courtesy of Teacher by the Beach! :-)
Read her post next for goodies you might need for guided reading!

While students read softly, you can prompt and observe individual students. This is when you have the opportunity to provide one on one instruction to students who have certain needs that you found during assessment. Monitor their comprehension, remind them of strategies to use to comprehend and decode words. While you listen to this student, be sure to make notes of other things you notice.
After the kids read, choose a concept to teach them if you noticed a common problem. If you noticed that they had trouble decoding certain words, then go over a reading strategy with them and practice it!
Then, have a comprehension conversation with the students, especially if it's the first time you're reading the text. You can focus on any sort of reading concept that the kids need (story elements, critical thinking questions, thinking critically about the characters and their choices).
At the end of the conversation it's the perfect time for a short word work lesson. You can do your phonics focus for the week, or something that the group needs in particular. Students can spell/read words with magnets. Or sort words by their vowel sounds into a t-chart!
Here are a few of the things I use for comprehension activities and word work during guided reading:
This is full of comprehension sheets, visualization forms, phonics activities and sentence work!
Students sort words between their short vowel word families.
Students sort the magic E word and it's short vowel version.
I use this when the kids are ready for magic e.
There are word work activities, and a reading passage with comprehension questions.

If you are going to read the same text the next day (which I would recommend), then this is a perfect time to implement a writing activity! The kids can write a short response to the book they've read. Again, choose a comprehension concept that meets their needs. You could give them a sentence starter such as, "The main character in the story was..." You could also have kids write the words beginning, middle and end. Then draw a picture of the different parts or write about the BME.
All of my students just keep a reading notebook where they write their responses.
I use my cut and glue reading response strips for this.

Thanks for reading this post! I hope it comes in handy this year! I know it was a great reminder for me as I enter a new year with my first graders!
I will be posting more through the year on what I actually do during guided reading time, so be sure to follow me and stay tuned!
********************************************************************
If you want to read more about reading in the classroom, check out my post to gather ideas on how to structure your reading block!


Thank you so much for this post! It is very helpful! :)
ReplyDeleteVery helpful post on guided reading!! Thank you!!
ReplyDeleteThis was an awesomely detailed post about guided reading! Thank you so much
ReplyDeleteAmazing!! Your stuff is wonderful!! Where do you get these adorable picture of the kids?? Love them!!
ReplyDeleteJaime
A Spoonful of Learning